Most Viewed
Latest Arrivals
  • PC Systems
  • Gaming PCs
  • Components
  • Monitors
  • Laptops
  • Gaming
  • Networking
  • Accessories
  • Deals
  • Clearance
Rated Excellent
FREE Delivery Over £50
Custom PCs built fast
3 year on-site PC warranty*

First Things To Do With A New Gaming PC as a parent

Unlock a world of entertainment for your family with a new gaming PC! Dive into the first steps every parent should take to ensure a safe and enjoyable gaming experience for their children.

First Things To Do With A New Gaming PC

Updated Jan 2024

Ah, there's nothing quite like that new PC smell, is there?

You can keep new car smell. You can keep the smell of a winter's morn. The odour of new plastic and warm thermal paste through the blades of a near-silent case fan as the soft glow of RGB lights up your room is enough to brighten any PC enthusiast's day. That first boot is something special. Fast forward to a month later, and if you've set things up properly, you should be enjoying a fast & easy boot as if it was that very first day. For most of us, though, the temptation is to just get started and install essential apps & games, go play our favourite shooter in glorious framerates and throw caution to the wind.

If you've followed our Top 10 Things You Should Never Do With Your PC guide, you'll know we love to optimise as much as possible to get the most out of a system, and spending just thirty minutes making sure your PC is a lean, mean gaming machine will pay dividends later on. These tips for brand new PC owners come from the IT experts here at CCL and some of the most respected PC geeks on YouTube, and will make sure that new battlestation stays in peak condition for as long as possible. It doesn't matter if this is your first gaming PC or your tenth, or if you are setting up a PC for a young gamer, these quick tips will help.

1. First Time Setup As A ParentFor A Child's PC

At the forefront of our priorities is addressing the needs of both novice and seasoned parents. Ensuring the safety and security of your child's PC is paramount. However, optimizing the system is equally crucial to prevent any parental concerns about performance slowdown after a few weeks of gaming.

First Time Setup As A Parent For A Child's PC

Embarking on the initial boot of your child's PC is both a significant and potentially bothersome task. If your young one is over the age of around 9 years old, they may wish to set up their PC themselves. However, for younger PC users, the primary goal is to dive straight into the exciting content. To streamline the setup for immediate gaming joy, all you need to do is power up the computer, connect it to the internet, and follow the straightforward on-screen instructions provided by the Windows operating system. It's beneficial to have a pre-established Microsoft account, which you can create here. This account serves as your launchpad for ensuring security and staying abreast of any updates to Windows. Additionally, it's crucial for parents to verify that Windows Update is current. Easily accomplish this by searching for Windows Update in the start menu.

Installing Drivers

After the initial setup, it's crucial to ensure all components are up-to-date, including motherboard drivers and software updates. Don't worry; this process is more straightforward than it might seem.

Begin by accessing the start menu and searching for Device Manager.

How-To-Set-Up-a-New-PC

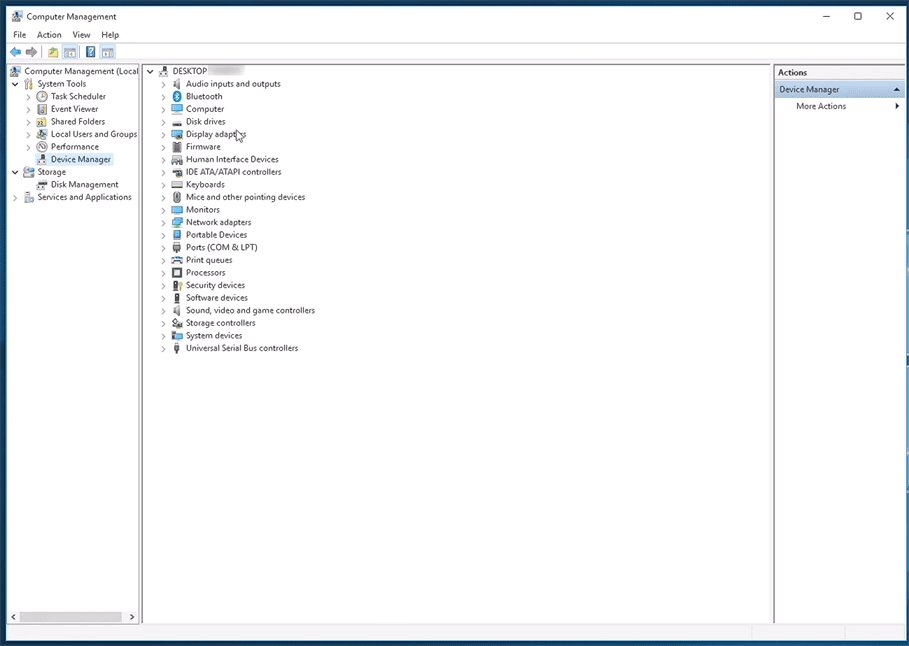
If you notice any exclamation marks or hardware lacking drivers in the Device Manager, right-click to easily update the drivers.

While Windows 10 and Windows 11 do a commendable job with default drivers, it's advisable to obtain the latest versions from the manufacturer's website for the motherboard drivers. If you're unsure about the part or model number, you can find this information by searching for System Information in the start menu and checking there:

Finding The Motherboard Model Number

Finding The Motherboard Model Number

Visit the manufacturer's website, search for your model number, and access a list of available downloads. This comprehensive set covers everything from sound drivers to optimization and monitoring tools, ensuring your child's PC is equipped with the latest features and enhancements.

Installing Graphics Card Drivers

Installing graphics card drivers is a breeze with both Nvidia and AMD, and you can easily find the latest installations here:


Safety & Security

The very first action you should take with a child's PC after first boot is making sure it is secure. There are plenty of free applications that will be sufficient, and there are also some paid options for advanced monitoring & safety, too. Your free Microsoft 365 account also allows you to handle Family Safety settings - and Windows 10 and 11 both come with built-in firewalls and security software, so it starts there.

Microsoft Defender

Getting started with Microsoft Defender is very simple. As of May 2020, Defender is now built-in and free for Windows 10 users, and ships with Windows 11. There are paid antiviruses out there, sure, but Microsoft Defender has proven to be one of the most secure and regularly updates with new virus definitions to keep PCs safe. Security watchdog, AV-Test, ranks Microsoft Defender with the highest possible marks for protection, performance and usability in their stringent tests that cover twenty one free and paid security tools.

To make sure you have protection enabled with Defender, simply open the start menu, search for Windows Security. Open this up and you should see the following:


Windows Defender Screenshot


If you don't see green check marks across the board, then you need to take action. Wherever there is a warning, simply click that icon and follow the instructions to enable Windows Defender security.

Parental Monitoring Software

The best step towards securing your child's devices is using the aforementioned Microsoft Family Safety, which will give you the bare minimum for monitoring their computer, console and smartphone usage, tracking their location and preventing them from viewing websites they shouldn't. Although the options are quite good for Microsoft Family Safety, most of the internet-based blocking solutions are reliant upon Microsoft Edge browser being used, which can be easily circumvented by a clever nine year old.

Besides using Microsoft Family, there are more advanced tools available which give you better control over the software and blocking capabilities on your child's PC.

Qustodio is a free/paid solution that helps parents and guardians monitor & block all of the important stuff on Windows, Android and other devices. For Windows, Qustodio offers several excellent features: -

  • Smart web filters
  • Multi-device
  • Advanced Facebook monitoring
  • Games & apps blocking
  • Time limits
  • Extended reporting


Qustodio Software

Unlike Microsoft Family Safety, Qustodio gives you application-level control on your child's PC, even as far as monitoring the videos your child watches on YouTube.

Internet Speed Optimisation

With gaming and HD streaming taking up huge chunks of bandwidth in the home, internet optimisation is critical to your happiness and sanity. Whether you have Virgin Media or one of the other high speed & fibre options out there, your router is the key component in making sure everyone has enough broadband for their devices.

Gaming over Wi-Fi can cause multiple problems (and headaches), so a wired (Ethernet) connection is always the best way to go. This involves plugging an Ethernet cable into the back of your router and the other end into the PC motherboard. If the PC is going to be upstairs in a bedroom, there are Cat 6 Ethernet cables that are low profile and will slot down the side of gripper rods & under carpets with a minimum of fuss.

"Wi-Fi really should be your last resort. [..] If you can, always use a Powerline connection when you can't get a wired connection" - PC Centric

If you don't like the idea of running wires around the house, you can also opt for an inexpensive Powerline adapter kit, which will enable you to connect the PC to the router via an Ethernet cable that plugs into a wall plug, using the electrical circuit to transmit & receive data at 100Mbps.


CCL Code: NET3664|
Part Number: TL-WPA4220 TKIT V4.0
|Manufacturer: TP-Link


If you want to extend Wi-Fi and have speeds of up to 1000Mbps, which is ideal for gaming in 4K or streaming movies on Netflix and Prime Video, there are Powerline kits available - such as the TP-Link TL-WPA8631P kit, which is reasonably priced.


TP-Link TL-WPA8631P WiFi Powerline Unit with Passthrough

Wall-Piercing Wi-Fi Extended to Every Outlet
  • 1 Powerline Unit
  • 3 Network Ports per extender
  • Wireless: Yes
  • AC Passthrough: Yes
CCL Code: NET4203|
Part Number: TL-WPA8631P
|Manufacturer: TP-Link


Powerline adaptors that include Wi-Fi are a massive game changer in a house full of devices that are all battling for bandwidth. One thing that can also stand in the way of connection quality is the modem/router itself. The Internet Service Providers will tell you that their SuperDuperHub V3000 is the best thing since sliced bread, but I wouldn't count on it. Support forums at Sky, BT and Virgin are littered with people having problems with connection for smartphones, consoles and PCs. If you are suffering from any connection issues, putting your supplied modem/router into modem only mode and purchasing a separate router to handle all the in-house traffic may be the solution.

I have personal experience with Linksys routers, and have never had an issue with the twenty one (and counting) devices connected to my network, which includes everything from a smart plug for my lights to gaming PCs. By using your supplied modem/router as a modem only, you are leaving all of the traffic management to the router, which is essentially what they are designed for.


CCL Code: NET4577|
Part Number: MR5200-100EUS
|Manufacturer: Netgear


The most popular broadband options are Virgin Media and BT, so you can easily find out how to swap your router/modem into Modem Only Mode by searching YouTube. To set up a router as Router Only (like the Linksys above), you need simply refer to the manufacturer guide.


2. Setting Up A Gaming PC

These 10 steps will help you get set up with your shiny new gaming PC, making it run a little quicker over the long term, and keeping it free of any rubbish building up. There's also some stuff for productivity, and a few common sense steps we should all take with a new PC.

Step1: Check For Packaging Materials!

Whilst some of this advice might seem like I'm teaching you how to suck eggs, some of it will also be a lightbulb moment for you. Just like it was for me when I realised the pre-built PC I bought a few years ago had a few small airbags for protecting my components in the case. I almost fired up the PC without removing said airbags, and if it hadn't been for a sharp-eyed seven year old, I might have had a disaster on my hands.

Inside your PC case you may find that the company you bought it from did the decent thing to protect the £1000 graphics card installed in it. You may find that there are airbags or bubble wrap, or even foam to keep everything in its place and safe. Remove all of these materials and check carefully that no polystyrene has made its way into the chassis or fans. It is also helpful to check none of the installed PCIe cards are loose, and everything looks to be in its place.

Step 2: Check The Motherboard Connections

If you have purchased a gaming PC with a dedicated graphics card, you will see that you have multiple options to plug in your monitor(s).


Rear View Of PC/Motherboard

Rear View Of PC/Motherboard


The topmost ports are the motherboard, and you can plug your monitor into these ports if you don't have a graphics card, and you're using integrated graphics built into the processor. If you have ports lower down on the case, then this is where you need to plug in. This is where your graphics card resides (usually in a PCIe slot).

Step 3: Install Drivers & Important Applications

You can check out how to install important drivers at the top of this article.

Step 4: Check Your Privacy Settings

If you don't want to be targeted by advertising companies while you're browsing, then you need to switch them off in Privacy settings.

Go to the start menu and search for Privacy Settings. You can turn off EVERYTHING you see here.


Turn Off Ads In Privacy Settings

Privacy Settings


Step 5: Set Up A Backup Routine

Backing up your Windows PC is very easy, and is an option built in with Windows 10 and Windows 11. To set up a backup routine, simply search for Backup in the start menu, and follow the instructions for backing up your files to another drive.

Step 6: Monitor Everything

To make sure your gaming PC is always running correctly, you can install one of the many monitoring applications that we recommend in our recent article. This will help you identify any thermal issues early, as well as monitoring your framerates when gaming.

Step 7: Check Your Monitor Settings

This might seem obvious, but ensuring your monitor is set up to perform at the intended refresh rates is actually critical to gaming. If you are not synced with your GPU, you'll notice screen tearing and other issues you do not want.

Too Much Tech made an excellent video explaining everything you need to know about gaming monitor setups, so we'll leave it to the video.


Step 8: Set Up Your Network

Some may skip past this advice, but it will be useful if you have any intention of sharing your files and documents with other devices - maybe a laptop or phone. Setting this up at the start will enable you to take full advantage of easy networking in Windows, and share videos to your smart TV among other things.

Click on the start menu and click Settings.

Click on Network & Internet Settings.

If your connection type is "Public", you'll need to change that by clicking Connection Properties and choosing "Private" as the network profile. Click back twice to return to the main network settings view.

Scroll down until you see "Network and Sharing Centre" and click it.

On the next window you will see an option in the sidebar to "Change advanced sharing settings". Click this.

You will now see the options for your "Private" network.


Turn on Network Discovery


The two options you want to switch on are "Turn on network discovery" and "Turn on file and printer sharing".

Next go to "All Networks" and turn on sharing for "Public folder sharing" and then choose media streaming options. Scroll down and select "Turn off password-protected sharing". This means other devices can access your PC files without entering a password. This is ideal for DLNA sharing and streaming.

Next, you will need to select some folders that you want to share. To do this, right click on any folder you want to share with the network, select "Give access to" and then select "Everyone" from the dropdown menu and click Share.

That's it!

To find the shared folders when you're on a different device, you will need to follow a few simple steps. Those steps are outlined in this video:


Step 9: Install Essential Applications

By carefully selecting apps that will aid productivity, and not bogging down your memory or storage with bloated software you will find your PC runs great, and does everything as intended.

We recently published an article about the 12 Applications Every Gaming PC Should Have, which curates a list of the essential software recommended by PC experts, and is - most importantly - the stuff you actually need on your PC. These apps are all about remaining small in resource usage whilst being big on usefulness. Check it out here.

Step 10: Be Good To Your SSD

It is very easy to forget that solid state drives are a huge part of a gaming setup. If you have an SSD and HDD setup, where your main games and OS are on your SSD, and a large capacity hard drive is there for all the huge files, then you are doing things properly. It is recommended that you use your SSD for the essentials, and anything you don't use that often or need storing for a while goes on the HDD.

To get the best out of your SSD, you should follow a few simple housekeeping rules: -

  • Do not defragment your SSD - SSDs save data as blocks, so these can be read anywhere on the drive at the same speed, no matter how scattered that data is. Defragmenting your SSD has no impact and will in fact put extra (unwanted) load on the drive.
  • Don't fill your drive to capacity - This is an important one. You should generally keep 25% of your drive free, and utilise a maximum of 75% of the capacity. This will keep everything running smoothly, and you won't see a degradation in performance. Deleting files on SSD means it is deleted using a TRIM command, unlike HDDs, where data is not technically deleted - just marked as such, until overwritten. This means you can periodically go through your files on SSD and actually delete them using a simple press of a key.
  • Refrain from storing large files on SSD - Every read & write function uses up the lifespan of an SSD, so accessing large video files is not recommended. Large capacity drives are better for this, and a HDD is not a costly investment.
  • Use an HDD for temp files - You can set your browser and operating system to write temp files to your HDD rather than the performance-driven SSD.


Last Word

There's nothing more to add, other than enjoy that new gaming PC feeling for as long as possible! You'll never experience the speed and performance as much as when it is box fresh and smells like it just rolled off the production line. So, enjoy it. And if you ever need any help in keeping your PC running smoothly and feeling as new as possible, you can always check back here on the CCL blog for more tips!